通过系统日志采集大数据
- 构建应用系统和分析系统的桥梁,并将它们之间的关联解耦。
- 支持近实时的在线分析系统和分布式并发的离线分析系统。
- 具有高可扩展性,也就是说,当数据量增加时,可以通过增加结点进行水平扩展。
目前使用最广泛的、用于系统日志采集的海量数据采集工具有 Hadoop 的 Chukwa、ApacheFlumeAFacebook 的 Scribe 和 LinkedIn 的 Kafka 等。
以上工具均采用分布式架构,能满足每秒数百 MB 的日志数据采集和传输需求。本节我们以 Flume 系统为例对系统日志采集方法进行介绍。
Flume 的基本概念
Flume 是一个高可用的、高可靠的、分布式的海量日志采集、聚合和传输系统。Flume 支持在日志系统中定制各类数据发送方,用于收集数据,同时,Flume 提供对数据进行简单处理,并写到各种数据接收方(如文本、HDFS、HBase 等)的能力。
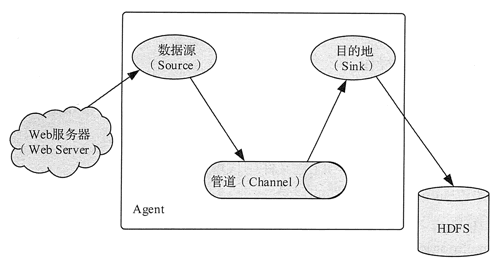
Flume 的核心是把数据从数据源(Source)收集过来,再将收集到的数据送到指定的目的地(Smk)。
为了保证输送的过程一定成功,在送到目的地之前,会先缓存数据到管道(Channel),待数据真正到达目的地后,Flume 再删除缓存的数据,如图 1 所示。

图 1 Flume 的基本概念
Flume 的数据流由事件(Event)贯穿始终,事件是将传输的数据进行封装而得到的,是 Flume 传输数据的基本单位。
如果是文本文件,事件通常是一行记录。事件携带日志数据并且携带头信息,这些事件由 Agent 外部的数据源生成,当 Source 捕获事件后会进行特定的格式化,然后 Source 会把事件推入(单个或多个) Channel 中。
Channel 可以看作是一个缓冲区,它将保存事件直到 Sink 处理完该事件。Sink 负责持久化日志或者把事件推向另一个 Source。
Flume 使用方法
Flume 的用法很简单,主要是编写一个用户配置文件。在配置文件当中描述 Source、Channel 与 Sink 的具体实现,而后运行一个 Agent 实例。在运行 Agent 实例的过程中会读取配置文件的内容,这样 Flume 就会采集到数据。
Flume 提供了大量内置的 Source、Channel 和 Sink 类型,而且不同类型的Source、Channel 和 Sink 可以进行灵活组合。
配置文件的编写原则如下。
1)从整体上描述 Agent 中 Sources、Sinks、Channels 所涉及的组件。
#Name the components on this agent
a1.sources = r1
a1.sinks = k1
a1.channels = c1
对于 Sink,需要指定结果是输出到 HDFS 中,还是 HBase 中等。
对于Channel,需要指定格式是内存、数据库,还是文件等。
#Describe/configure the source
al.sources.r1.type = netcat
al.sources.r1.bind = localhost
al.sources.r1.port = 44444
#Describe the sink
a1.sinks.k1.type = logger
#Use a channel which buffers events in memory.
a1.channels.c1.type = memory
a1.channels.c1.capacity = 1000
a1.channels.c1.transactioncapacity = 100
#Bind the source and sink to the channel
a1.sources.r1.channels = c1
a1.sinks.k1.channel = c1
flume-ng agent -n a1 -c ../conf -f ../conf/example.file\
-Dflume.root.logger = DEBUG,console
- “-n”指定 Agent 的名称(与配置文件中代理的名字相同)。
- “-c"指定 Flume 中配置文件的目录。
- “-f”指定配置文件。
- “-Dflume.root.logger = DEBUG,console”设置日志等级。
Flume 应用案例
NetCat Source 应用可监听一个指定的网络端口,即只要应用程序向这个端口写数据,这个 Source 组件就可以获取到信息。其中,Sink 使用 logger 类型,Channel 使用内存(Memory)格式。1)编写配置文件
# Name the components on this agent
a1.sources = r1
a1.sinks = k1
a1.channels = c1
# Describe/configure the source
a1.sources.r1.type = netcat
a1.sources.r1.bind = 192.168.80.80
a1.sources.r1.port = 44444
# Describe the sink
a1.sinks.k1.type = logger
# Use a channel which buffers events in memory
a1.channels.c1.type = memory
a1.channels.c1.capacity = 1000
a1.channels.c1.transactionCapacity = 100
# Bind the source and sink to the channel
a1.sources.r1.channels = c1
a1.sinks.k1.channel = c1
2)启动 FlumeAgental 服务端。
$ flume-ng agent -n al -c ../conf -f ../conf/neteat.conf \
-Dflume.root.logger=DEBUG,console
3)使用 Telnet 发送数据。
以下代码为从另一个终端,使用 Telnet 通过 port 44444 给 Flume 发送数据。
$ telnet local host 44444
Trying 127.0.0.1...
Connected to localhost.localdomain(127.0.0.1).
Escape character is '^]'.
Hello world! <ENTER>
OK
4)在控制台上查看 Flume 收集到的日志数据。
17/6/19 15:32:19 INFO source.NetcatSource: Sources tarting
17/06/19 15:32:19 INFO source.NetcatSource: Created serverSocket:sun.nio.ch.
ServerSocketChannelImpl[/127.0.0.1:44444]
17/06/19 15:32:34 INFO sink.LoggerSink: Event:{ headers:{} body:48 65 6C 6C 6F 20 77 6F 72 6C 64 21 0D Helloworld! .}
所有教程
- C语言入门
- C语言编译器
- C语言项目案例
- 数据结构
- C++
- STL
- C++11
- socket
- GCC
- GDB
- Makefile
- OpenCV
- Qt教程
- Unity 3D
- UE4
- 游戏引擎
- Python
- Python并发编程
- TensorFlow
- Django
- NumPy
- Linux
- Shell
- Java教程
- 设计模式
- Java Swing
- Servlet
- JSP教程
- Struts2
- Maven
- Spring
- Spring MVC
- Spring Boot
- Spring Cloud
- Hibernate
- Mybatis
- MySQL教程
- MySQL函数
- NoSQL
- Redis
- MongoDB
- HBase
- Go语言
- C#
- MATLAB
- JavaScript
- Bootstrap
- HTML
- CSS教程
- PHP
- 汇编语言
- TCP/IP
- vi命令
- Android教程
- 区块链
- Docker
- 大数据
- 云计算